DIY - New Build Project

Gunsmithing & DIY forum for everyone. Enjoy!
Post your projects, questions and advice here.
User avatar
albow
.257 Roberts
Posts: 787
Joined: Fri Oct 20, 2006 7:40 am
Location: Nth Queensland

Re: DIY - New Build Project

Post by albow »

A couple of piccy's of the planning and working out the right height. I effectively set up my LG and rear bag to try and establish what height to get to, width and length etc..... I definitely need to look at another attachment method for the front and rear pods though... :lol: :lol:

Image Image
User avatar
Camel
Ultimate AusVarminter
Posts: 12084
Joined: Sat May 28, 2011 8:51 pm
Favourite Cartridge: 20-222 6x47 rem, 250
Location: Northern Riverina NSW

Re: DIY - New Build Project

Post by Camel »

A bit of silicon should hold the pods on mate, the clamps are a little out dated I think. :D As to all the rest, wow you sure go to some effort there. Keep em coming.
User avatar
albow
.257 Roberts
Posts: 787
Joined: Fri Oct 20, 2006 7:40 am
Location: Nth Queensland

Re: DIY - New Build Project

Post by albow »

Camel wrote:A bit of silicon should hold the pods on mate, the clamps are a little out dated I think. :D As to all the rest, wow you sure go to some effort there. Keep em coming.
Was thinking sikaflex as it is probably a bit better than normal silicone :mrgreen: :mrgreen:

As to the rest of the effort, for me it is all part of the hobby and all part of wanting to be at the pointy end of the LR competition :D :D The more I can do myself the better. I get what I want, exactly how I want it, I get the sense of satisfaction when it goes well and you got no one to blame when it doesn't :lol: :lol:

Also it enables you to keep costs down with the sport as this stock will run at well less than $150 for materials and consumables to build and then just my time to build it. Don't know of too many HG style stocks that would be that cheap :shock: :shock: It also gives me a chance to "relax" as this work is not my normal job and being a former tradie I find it quite relaxing to be working on a project like this and enjoy getting in and building something. Gives the wife some peace too and I would much rather be working in the shed than watching TV. I will definitely keep posting info on progress :wink:
User avatar
MISSED
Moderator
Posts: 8369
Joined: Sat Dec 22, 2007 12:23 pm
Favourite Cartridge: 20 PPC
Location: YASS

Re: DIY - New Build Project

Post by MISSED »

Thanks for taking the time and putting in the effort to put up this Thread Albow.

I am loving it
User avatar
curan
.338 Lapua Magnum
Posts: 2405
Joined: Sat Aug 18, 2007 1:53 am
Favourite Cartridge: 30/30
Location: Mid North, South Australia

Re: DIY - New Build Project

Post by curan »

MISSED wrote:Thanks for taking the time and putting in the effort to put up this Thread Albow.

I am loving it
+1! 8)
justjeff
22-250 Remington
Posts: 576
Joined: Tue Jul 08, 2008 7:49 pm
Favourite Cartridge: 270 Win

Re: DIY - New Build Project

Post by justjeff »

Looking good Al,

Just finished repainting the kitchen benchtop I use for a stock, looks good too. You have a reasonable amount of vertical room for the bits to make the rear rest adjustable. I have spent some time on both my rests, put a 1.5 inch centre post in the front rest, and a more aggressive securing mechanism to stop lateral movement caused by the centre post twisting. Over the next few months I will be going back to rear adjustable, just not exactly sure how I will do it yet.
Pity the dinosaurs who shoot fly won't allow it though. Interesting to note that some of the said dinosaurs are quite happy to change 1000yd to electronic targets, then tell us we live in the past if we disapprove, but don't even think of changing their precious fly rules!!!! :stir:

Jeff
User avatar
albow
.257 Roberts
Posts: 787
Joined: Fri Oct 20, 2006 7:40 am
Location: Nth Queensland

Re: DIY - New Build Project

Post by albow »

What colour did you go with on the kitchen bench top?? Racy red or flat black :lol: :lol: :lol: :lol:

Yeah there is plenty of room for adjustable rear rest just trying to work out best way to do it. I am seriously looking along the lines of a joystick for windage adjustment only. Then there is no sag in elevation from the rest throughout the string with just making elevation adjustments on the speed screw of the front or rear rest.This could be a lot easier than first thought as I have my joystick that I use for F Class that I could mount up in a new rear plate system........... Still looking at options and the easiest way out with a quality system :roll: :roll:
justjeff
22-250 Remington
Posts: 576
Joined: Tue Jul 08, 2008 7:49 pm
Favourite Cartridge: 270 Win

Re: DIY - New Build Project

Post by justjeff »

Hi Al,

Went with red, had some left. Talk to TZ about the geometry regarding front and rear elevation adjustment, there are some differences apparently, but I wasn't wearing my smart hat the day he explained it to me. I found that having windage and elevation on the old rear rest close together was good, as it was fast. JR has a set of those steel 45 deg bevel gears, I bought him a set when I got mine.

Jeff
User avatar
albow
.257 Roberts
Posts: 787
Joined: Fri Oct 20, 2006 7:40 am
Location: Nth Queensland

Re: DIY - New Build Project

Post by albow »

Ok well after a few quiet days on the build project, today saw me back into the fray with the point of no return crossed if I want to shoot the first match for 2015 as I unglued the barrelled action from my LG to inlet the stock. The work this afternoon saw me unglue my LG and pull the barrelled action out, inlet the new stock, drill the pods for the bolts to fix them to the stock, drilled and set the threaded inserts for bolting the pods on into the stock.

Photos of the action below and should make it a bit clearer on how the little inserts I made the other day are now going to fit into the stock :lol: :lol:

Image Image

Image Image

Image Image
User avatar
Camel
Ultimate AusVarminter
Posts: 12084
Joined: Sat May 28, 2011 8:51 pm
Favourite Cartridge: 20-222 6x47 rem, 250
Location: Northern Riverina NSW

Re: DIY - New Build Project

Post by Camel »

Keep going mate, you haven't convinced me yet, but then I am an obstinent bugger at the best of times. :twisted:

Some very fancy work involved there. :D

Re the inlet, I take it that it is a single shot action, do you have any fancy little nooks and crannies in there that you have to dig out or is it just a straight inlet the same as the barrel channel and you take up any voids with the bedding. ?
User avatar
albow
.257 Roberts
Posts: 787
Joined: Fri Oct 20, 2006 7:40 am
Location: Nth Queensland

Re: DIY - New Build Project

Post by albow »

Camel

Definitely singleshot so no mag to do and I don't run a cut recoil lug as I personally think taking out the section for the lug can only "weaken" the stock allowing for flex. Instead I leave the recoil lug out and use the section on the bottom of the action to fill with the glue and create a lug into the action as per the photo attached so pretty easy as just the barrel channel, trigger slot and bolt handle recess :wink: :wink: I glue all my actions in and on the LG I also screwed it on pillars just for a belts and braces type of effect....... you know just in case the glue in was to let go :lol: :lol:

For this stock I won't be putting in the pillars but will be screwing it in again. The alloy in the stock will be a nice section to bed / screw against so will probably remove some timber from between the alloy to fill with glue and bed the action against the alloy similar to a pillar with the head of action screw set into and able to pull down on the plate making up the front pod. It will all become clearer with the future photos as I do each step :wink: :wink:

As far as convincing you, I know your taking notes to do some mods to that bunny gun :lol: :lol:

Image
Last edited by albow on Fri Jan 02, 2015 8:51 pm, edited 1 time in total.
User avatar
albow
.257 Roberts
Posts: 787
Joined: Fri Oct 20, 2006 7:40 am
Location: Nth Queensland

Re: DIY - New Build Project

Post by albow »

A couple more photos of the inserts for holding on the pods.... to show how they fit into the stock :D

Insert sitting on stock

Image

Hole cut to place insert into the stock

[/im]Image
User avatar
Camel
Ultimate AusVarminter
Posts: 12084
Joined: Sat May 28, 2011 8:51 pm
Favourite Cartridge: 20-222 6x47 rem, 250
Location: Northern Riverina NSW

Re: DIY - New Build Project

Post by Camel »

Thanks for taking the time to explain your bedding, good stuff.
As for similarities with the "Bunny Gun" as you so nicely put it, I have a laminated stock, and there it ends. :lol:

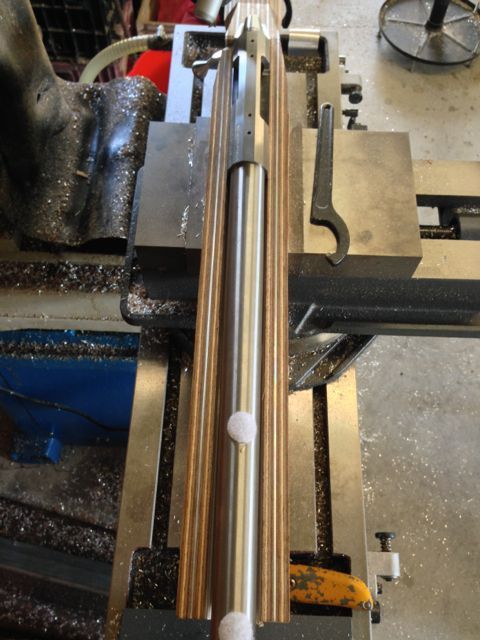
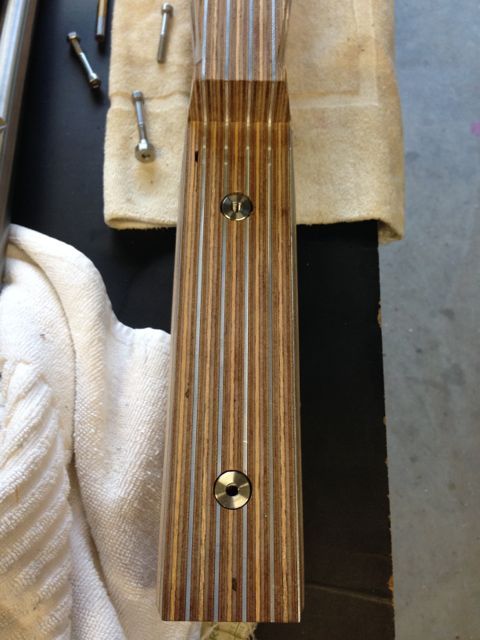
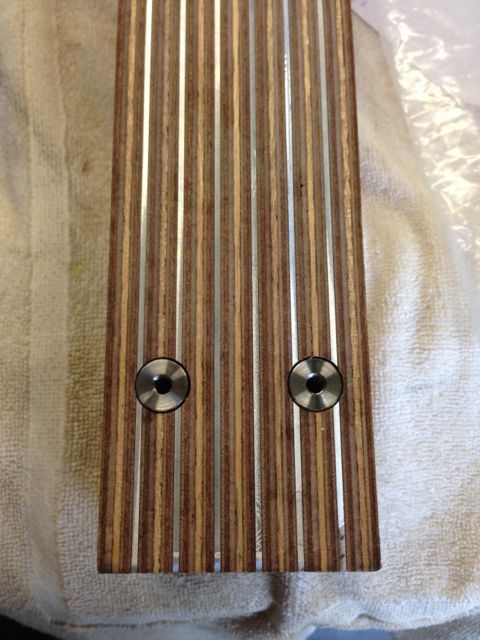
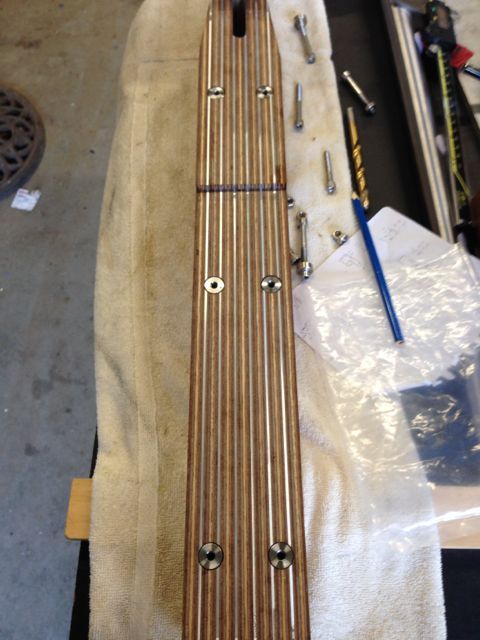
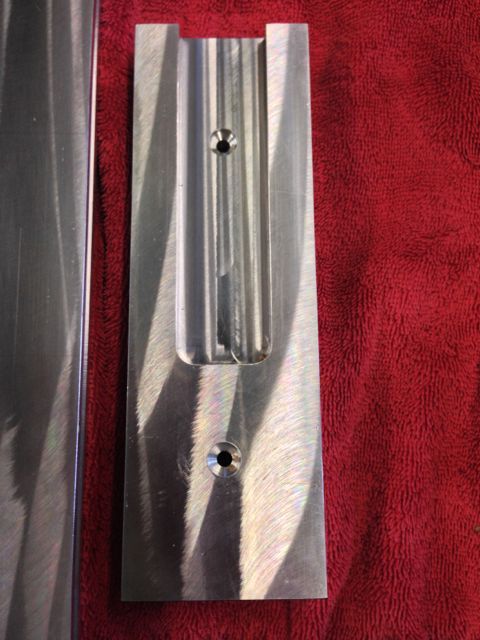
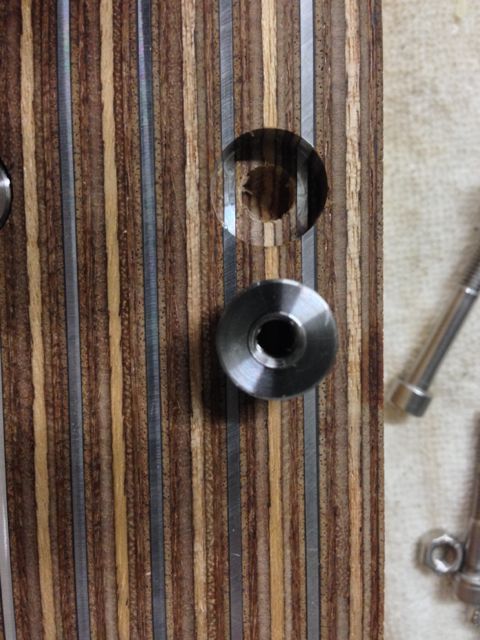
Nother question for you, when the inserts are placed in the stock, the little nut goes in underneath, samiched between the small bit of the insert and the stock, in the small hole, yeah ?
Do you then glue the inserts into the stock ?
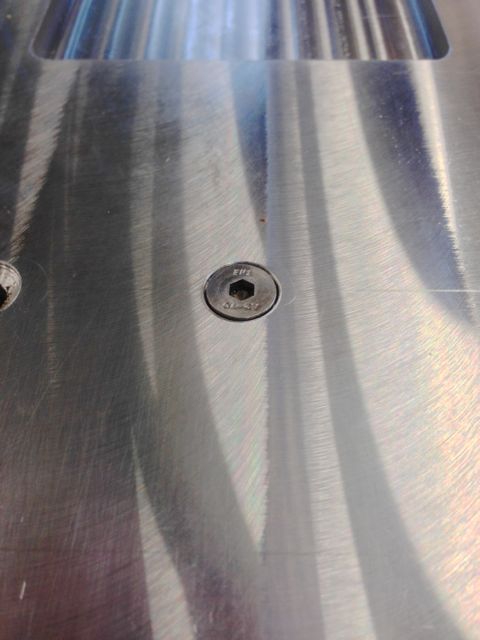
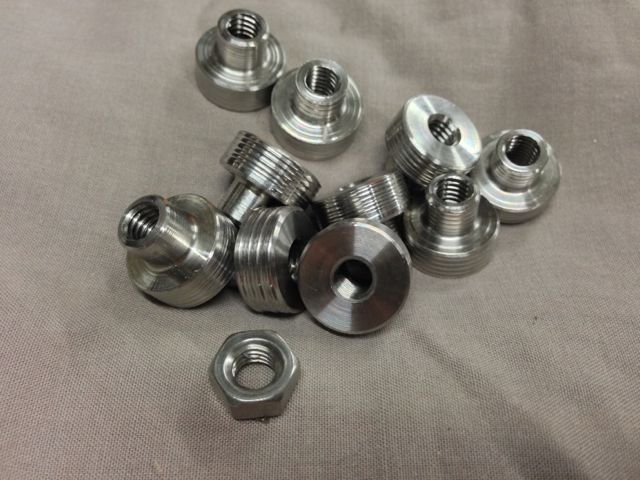
I take it the inside of the insert is not threaded ?
Would it not be stronger if the inserts were threaded and went further into the stock, then glued in ?

Sorrry that's four :oops:
User avatar
albow
.257 Roberts
Posts: 787
Joined: Fri Oct 20, 2006 7:40 am
Location: Nth Queensland

Re: DIY - New Build Project

Post by albow »

Laminated is a start :lol: :lol:

The inserts are threaded and will be glued in the stock as the "nut" for the bolts to screw into. You can see the thread inside the inserts in the attached photo.

I made these so that they were larger than just gluing a normal nut into the stock. That is also why they have my best machining finish possible on the outside and turned out all grooved........... so the glue will hold them nicely :)

Image
User avatar
Camel
Ultimate AusVarminter
Posts: 12084
Joined: Sat May 28, 2011 8:51 pm
Favourite Cartridge: 20-222 6x47 rem, 250
Location: Northern Riverina NSW

Re: DIY - New Build Project

Post by Camel »

Thanks mate, stuffed up there a bit, forgot you already put that photo up, ah well, at least now I can start blaming it on age. :roll:
Post Reply